
Prismware LapDancer
Fundamentals of Faceting
Version 2.0
2022-08-07
Copyright © 2022 Prismware, Inc.
Table of Contents
Positioning the Piece on the Pad 7
Using common terms for the various parts of the LapDancer will make further discussions easier. Therefore, this first section will identify each piece of the LapDancer.
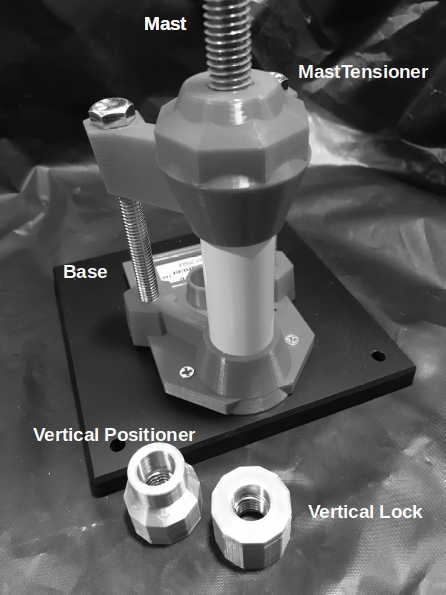
Mast The 1/2” threaded rod that holds the LapDancer Arm
Mast Tensioner The assembly that keeps the mast tight to the Base
Vertical Positioner Sets the height of the Arm
Vertical Lock Tightens against the Vertical Positioner to keep it
from rotating out of position while faceting.
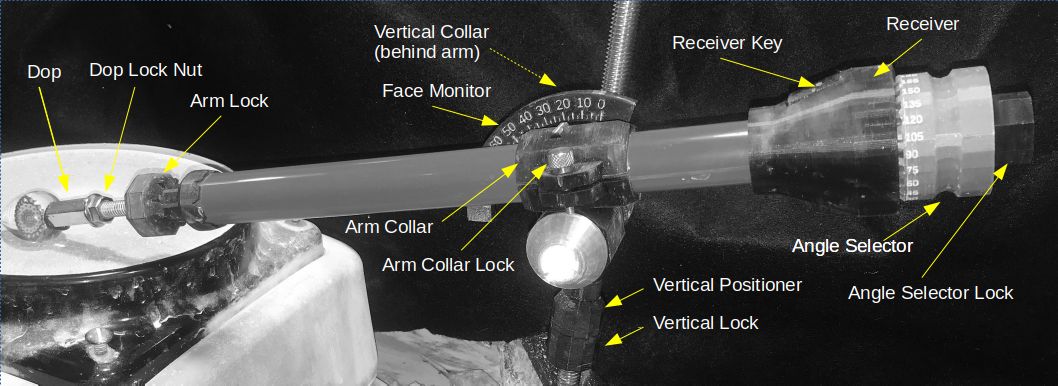
Dop 3/8”-16 threaded coupler; attaches the piece to the Arm
Dop Lock Nut 3/8 flanged lock nut
Arm Lock Used to secure the Angle Selector angle while faceting
Vertical Collar Holds the Arm Collar to the Mast (not shown in picture).
The Vertical Collar is made up of the main body and two
Vertical Sleeves.
Face Monitor Shows the angle of the Arm relative to the grinding surface
Arm Collar Holds the Arm to the Mast via the Vertical Collar
Arm Collar Lock Secures the Arm in the Arm Collar
Receiver Holds the AngleSelector
Receiver Key Secures the selected angle of the AngleSelector in the
Receiver. This is a replaceable item.
AngleSelector Provides a set of prescribed faceting angles
AS Lock Holds the AngleSelector onto the Arm
Objects are attached to the LapDancer in one of two ways: a dop or the PipeGrinder. The PipeGrinder is a hand tightening chuck that will securely hold an object on a punty. The dop is used for pieces that are not attached to a punty, either a rod or blow tube and are attached using some type of adhesive.
Trial and error has show that a quick setting epoxy works very well with the LapDancer dop (a 3/8”-16 coupling nut available at Home Depot). The epoxy sets up in 10-15 minutes and comes off using the heat of a typical lighter.
To adhere the piece to the dop:
Put equal parts epoxy and hardener on a clean clean surface. For a small, single piece, you won’t need more than dollops the size of your pinky fingernail.
Thoroughly mix the two parts
Apply the epoxy mixture to the top of the dop
Place the piece to be worked on the dop, centering it as best you can.
If needed, add some epoxy around the dop/piece joint for additional strength.
Allow 10-15 minutes for the epoxy to set up.
Test to see if you can pull the piece off the dop. If you can’t, you’re ready to facet.
To remove the piece from the dop:
Remove the dop from the LapDancer arm
Hold the dop with something – the arm extension that comes with the LapDancer is ideal for this – just use the lock nut to keep the dop in place.
Use a lighter to heat the dop just behind the epoxy. Rotate the dop until you start to smell the epoxy heating up.
Place the piece against a surface (preferably wood) and apply light pressure. When the epoxy is heated sufficiently, the piece will pop off the dop.
Use a thin knife to clean the epoxy off the top and out of the threads of the dop.
Once cool, use your fingernail or acetone to clean any remaining epoxy off the piece.
Simply slide the punty of any size up to 12.7mm / 1/2” into the chuck and tighten. If you are concerned about crushing the punty or having it slip, a turn of electrical tape around the end can be helpful.
Whether you are using the PipeGrinder or a dop, first verify the Dop Lock Nut is already on the arm. Thread the PipeGrinder or dop onto the arm, then secure it with a wrench on BOTH the PipeGrinder/dop AND THE dop lock nut. Using a wrench on just one will surely break the Receiver Key.
Lining up the first cut with a pattern in the marble can be tricky. I have found it best to lower the arm as far down as it will go, make sure the AngleSelector is set to 0°, then kneel down and look to align the piece. Hold the Dop with one wrench, then carefully set the Dop Lock Nut with the other wrench. It’s tricky but it can be done.
This can initially be intimidating, but eventually thinking in terms of AngleSelector degrees will become almost second nature. Until then, please consider using the Faceting Calculator on the Prismware site:
Before we go further there are a few terms that will be helpful when discussing faceting.
Crown The top of the piece
Girdle The middle of the piece (also referred to as a pavilion or equator)
Tier The latitudinal cross-section of the piece .
Also referred to as the face.
Facet An individual cut into the glass on the tier.
Table A flat facet cut into the crown of the piece.
The calculator aside, let’s walk thru the steps of setting up a faceting plan. First, we must decide which AngleSelector to use. To make this decision, let’s first see what the various AngleSelectors can do in general:
AS45 Multiples of 4 Minimum angle: 22.5°
AS40 Multiples of 9 Minimum angle: 20°
AS36 Multiples of 5 Minimum angle: 18°
AS30 Multiples of 6 Minimum angle: 15°
To change AngleSelectors, unscrew the AS Lock from the back of the arm and slide the AS off the arm. Slide the desired AS onto the arm so the key fits any of the AS slots snugly. Thread the AS Lock on to the arm and finger tighten in place.
So let’s say we want to cut three tiers (faces), with each tier containing six facets. Furthermore, we want the facets on the middle tier to be offset from the top and bottom tier of facets. The settings of the AS30 are shown below:
|
Tier 1 |
0 |
60 |
120 |
180 |
240 |
300 |
|
Tier 2 |
30 |
90 |
150 |
210 |
270 |
330 |
|
Tier 3 |
0 |
60 |
120 |
180 |
240 |
300 |
But what are the values for Tier 1-3? That is going to be determined by you, the artist. The closer you start to the crown, the smaller the facets will need to be to meet at a point at the top. If that isn’t what you’re looking for, then you can start further down from the crown. If you want them to meet at the top, a good starting point would be around 65° - 75°, depending on the piece. The subsequent tiers will likely be between 15° - 20° further away from the crown in order to get a decent overlap. So, in our example, one possible strategy would be to place our tiers at 65°, 50° and 35°.
Now that we have the piece attached to the Arm and a plan, it’s time to set up and get grinding.
Make certain that the AngleSelector is set to 0° assuming that is where you want to start.
Use the Vertical Positioner to raise/lower the arm until the Face Monitor shows the angle the chosen starting angle. Loosening the Arm Collar Lock will allow the arm to slide back and forth, providing some fine-tuning of the angle and locate the piece centrally on the pad.
There is a little trick to figure out where a facet will be oriented on the piece. Get a dry erase marker and cover the area of the piece around where you suspect the wheel will contact it. With your polishing pad on the wheel (so you don’t scratch), rub the piece on the polishing pad. This will show you exactly where the facet will be centered. This trick is helpful to establish the first facet’s location, but is especially handy when planning the first cut on a tier that overlaps the previous tier.
Once you have the piece oriented where you want, double check that the Vertical Lock is tightened against the Vertical Positioner and that the Arm Collar Lock is snug. (Note: The Arm Collar ears should not be touching – the Arm Collar Lock will hold the Arm in position with minimal force. If you tighten it down to the point where the ears are touching you WILL break the LapDancer.)
Using the Arm Lock is generally not necessary. When the LapDancer was first made, the Arm Lock was vital to keeping the AngleSelector in place. However, Prismware has upgraded the Arm components and the spring currently used will hold all but the largest pieces in place. If you do use the Arm Lock, be careful when you are tightening it; if you twist too hard you can rotate the AngleSelector enough that getting a polish is tough. In general, leave the Arm Lock open about 1/2” or so – enough to change angles – and just leave it there. Watch to make sure the vibration of the arm doesn’t rotate it beyond an inch or so from the end of the Arm tube.
Determining what pads work best will become a very personal decision. Every artist has their own approach, so I’ll share what I do and why. You can start there and make your own decisions on what works best for you as you gain experience.
Most of my work is done with marbles under 2”. For larger cuts on a piece in that range, I’ll start with a well dressed 500 steel (shaping), clean that up with a 325 resin (pre-polish), then go to the LP66 polishing pad (polish) that is charged with cerium. For smaller cuts I’ll simply use the 325 resin and the LP66. For very small cuts I will use the 600 resin and LP66.
The general idea is that the grittier a pad, the faster the cut but the more scratches are left. Each pad you use must remove the scratches of the previous pad, leaving shallower scratches on the surface. The LP66 with cerium uses mechanical and chemical force to remove the minute scratches and restore the optical surface of the glass.
So, we have the plan. We have what we hope will be the correct shaping pad mounted on the wheel. Start spinning, start the water, and….
The LapDancer Arm rotates around the Mast, allowing you to grind back and forth across the pad. Some people use very little pressure; others really push. If you use a lot of pressure, the faceting will go quicker but it is likely that you will leave deeper scratches and spend more time doing pre-polish work.
Just as a note – because of the LapDancer’s design, it is rather difficult to re-acquire a tier angle. Therefore, the recommended approach is to complete all the facets on a tier, from shaping to polish before going on to the next tier.
The way I approach shaping is to count 5 or 10 strokes, then look to see how the piece is reacting to the pad. If I’ve barely made an impression, I may consider changing to a grittier pad (for instance, go from the 325 resin to the 500 steel). When things are progressing in a reasonable way, I’ll continue counting the strokes, checking every so often on the first cut so I don’t over-grind the piece. You can always take off more glass but you can’t put any back!
Once the first facet appears to be in the range I’m looking for, I’ll move to the next angle. If you’re using the Arm Lock, don’t forget to loosen it up. Pull back on the AngleSelector until it clears the Receiver Key, then rotate to the new angle and allow the spring to help you set the AngleSelector against the key at the new angle.
Once the new angle is set, start grinding again, counting the strokes. The first few facets I’ll continue to check early to make sure everything is positioned as desired. After I know things are progressing well, I’ll generally do about half the strokes and do a cursory check of the facet (so if my total count is 50, I’ll check around 25 or 30 strokes in to make sure all is well).
The first two facets will tell a lot about how the tier is shaping up. If the facets don’t touch (and that was the goal), I’ll count out some additional strokes on the second facet, then return to the first and add the same number of strokes (say, add 30 to the original 50 strokes for a total of 80). If that provides the desired overlap, then move on to the third facet and do 80 strokes.
In our example, we are doing 6 facets per tier. When all 6 are complete, inspect the work. Do the facets fit together nicely? Are they all the same height up the piece? If they meet at the crown, do you see even lines running across the crown? If things are close, then continue to pre-polish. If you see that one facet is larger, or that the facets do not overlap evenly, you may want to consider adding a few more strokes to each piece, or even doing a couple of strokes on individual facets to make them symmetric and match the other facets. This can happen if the glass isn’t perfectly shaped. Keep in mind the LapDancer is an artist’s tool, meaning the intention is for you to inspect and correct, just as you would with a paint brush on a canvas. And again, never forget you can always take more glass off, but….
This is where it all starts coming together – or going horribly wrong. Whether you are using a used 325 resin (as I do) or something finer, the goal is the same; to remove the scratches left by the shaping pad(s). In the best world, the pre-polish pad will be almost silent as the face slides across the surface. The pre-polish smooths the surface evenly to a milky, frosted glass finish.
It is absolutely crucial to count your strokes at this stage. The pre-polish pads are still removing enough glass to make a significant difference in the outcome. Polish the first facet until you get to that consistent, milky finish across the facet. Inspect the facet carefully using a bright overhead light or, better yet, a flashlight. There should be no visible scratches on the surface. You will notice that the facet is now larger than the other facets. Move to the next facet and count your strokes, checking every so often that the surface is getting cleaned up, but also that the size of the facet is approaching the same size as the first facet. Continue around the tier until all facets are pre-polished.
Just as in the shaping, inspect the facets carefully to make sure that they share even overlapping, the same height and shape. If you are working on a point at the crown, there will invariably need to be a bit of tweaking – a stroke here, a few strokes there, in order to get the lines that meet at the top to be straight and even. This is critical to the successful completion of the facets – polishing does not make a significant difference in the size of the facet, so this is the last chance to make adjustments.
If part of a facet will not clean up, you may have a problem. Check to make sure that the Vertical Positioner and Lock are tight and that the Arm Collar Lock is set. If either (or both) of these got forgotten (and I promise you, it will happen – it does to me and I created the darn thing! :D ), the best you can do is to re-acquire the facet as best as you can, and see if you can get the pre-polish to work. If not, you may have to redo the tier with a grittier pad, then return to pre-polishing.
I highly recommend using the His Glassworks LP66 polishing pad, impregnated with cerium. I have not used very many other options, but by all accounts this is the fastest way to get to a polish. (See notes on preparing and using the LP66 later in this document.)
The process is very much the same as the previous steps; you set the facet angle with the AngleSelector and grind the piece on the pad. At this point, pressure is good. You may count strokes while polishing, but the truth of the matter is you polish until the facet is polished. If the pad is working well and pre-polishing was successful, it should take a fraction of the strokes to get to a clean facet. Be sure to dry the facet thoroughly and inspect it with a bright light – water will hide blemishes.
If there is a small section (usually an edge or a corner) of the facet that simply will not polish (and there are no other obvious scratches from the prior pads), just let it go. In some cases, the edge will get ground away with the next tier of facets anyway. However, if at the end of all the tiers and all the facets there is still a bit of milk here and there, remove the piece from the arm (but leave it on the dop). Again, using a bright light, find any stray bit of milk and cover it with the ink from a Sharpie pen (fine tip for a preference). Start up the polishing pad again, and either by kneeling down and lining the facet up by eye while holding the dop, or by looking thru a clear piece, hand polish the piece until the ink is gone. This process is quick and rather efficient – just hold onto the dop tightly as this would be a bad time to watch your piece go shooting across the room.
A common question that comes up is how much water to use when grinding. The answer is that it depends to some extent on the pad.
If you’re using anything steel or a resin pad grittier than a 325 (e.g. 220), a full stream should be used. A steel pad tends to be more aggressive and will generate more glass dust and friction. The water will help mitigate both.
NOTE: This is the perfect place to bring up safety. If you are grinding glass, wear a mask. Silicosis is no joke, and dying from scarred lungs from glass dust inhalation is both slow and painful. Mrs. Prismware gets on me when I forget and I’m passing the nagging on to you because, quite frankly, she is absolutely right.
If you’re using a 325 or finer resin pad, I typically use a steady drip. Some value of drops per second is what I aim for, with a larger number for a grittier pad (e.g: 10 drops for a 325, 5 drops for a 600).
The LP66 and other polishing pads (especially cerium based pads) are interacting with the glass surface both mechanically (grinding) and chemically (melting) to restore an optical quality to the glass. The cerium can get hot enough in a very small area to essentially melt glass. Therefore, a trickle of water (say 3-4 drops/second) is necessary to keep the cerium from overheating and literally baking itself into the glass. This is very hard to remove. If you’re doing the first polish of the day, I recommend running a steady stream for a second or two while the pad is spinning to wet the entire surface, then adjust the flow to the slow drip mentioned above.
One more word on pad use. When you are done with a steel or resin pad, cleaning it off will extend the pad’s life. Before removing it, run a steady stream of water and clear out the accumulated glass. I actually keep a toothbrush next to my wheel, which I run from axle to hub to clean the pad.
Pads, especially steel but resin too, are wonderfully constructed devices with crushed industrial diamonds impregnated in the material. However, there can be the occasional diamond sticking out where it doesn’t belong, and that one little diamond will dig a trench through the surface of your glass. Once there, you have a choice between a visible scratch or starting over with the shaping pad to cut the entire surface of the facet to below the scratch (which means you get to re-cut ALL the facets on that tier, and the overlapping tiers, etc).
Therefore, when you get new pads, have a handy piece of sacrificial, flat glass or a dressing stick from His Glassworks. Spin the pad up to speed (running water and wearing your mask, of course) and grind that glass from axle to rim several times. This will level the pad out and remove any over-exuberant diamonds from leaving a lasting impression.
This is one of the most common questions. When the LP66 arrives, it is a salmon color and, while it might polish some, it just doesn’t work without cerium. But, as some have discovered, just squirting some cerium on doesn’t really work either. When the pad arrives, make a thick slurry of cerium and water and rub it into the entire surface of the pad. If the slurry looks a bit too thin, sprinkle some cerium powder onto the surface and rub it in. You should not have cerium caked above the level of the pad – that’s just wasting it. However, the pad should look completely white. Then, let it dry, preferably overnight. When the pad is new, you may need to do this a couple of times to really get the cerium embedded in the pad.
Make a liquid of about 1-2 parts water with 1 part cerium. I keep mine in a bicycle water bottle (clearly marked with CE and Cerium). If you’ve done a lot of polishing, you have more to do and the pad isn’t working quite as well, or you have a troublesome facet and need a bit of a cerium boost, squirt a bit on while polishing. A little goes a long way (and a lot will just get spun off the pad, so you might want to have an apron around).
When I’ve completed my faceting for the night, I’ll spin the LP66 on the wheel, slow it down with my finger, then squirt cerium from the axle to hub until the pad is covered. I then leave it on the wheel overnight to help it recharge.
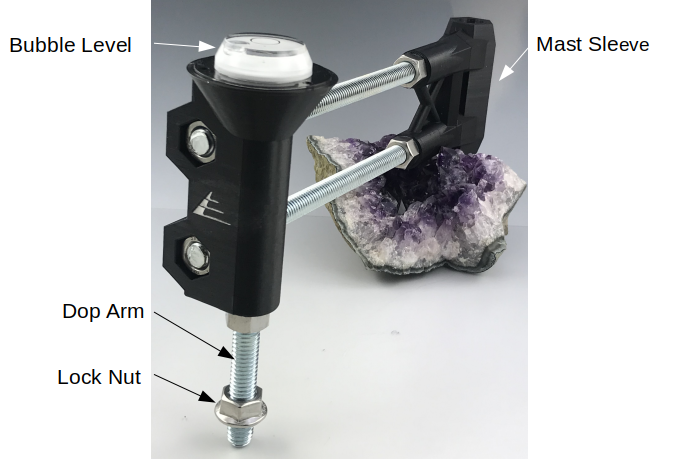
Secure the dop or the PipeGrinder to the Dop Arm using the Lock Nut.
Note: use two wrenches – one on the dop and one on the Lock Nut.
Remove the LapDancer faceting arm from the Mast
Slide the TopGrinder onto the Mast
Use the Vertical Positioner to adjust the height of the TopGrinder. Once the piece is in contact with the lap whee, the Bubble Level can be used to indicate when the piece is level
Begin grinding the piece with one hand while holding the Vertical Positioner with the other. If a large table is being created, the Vertical Positioner may be used to make slight adjustments to the TopGrider height to keep the piece level.
Repeat the process for each pad until the table is polished
Remove the piece using two wrenches
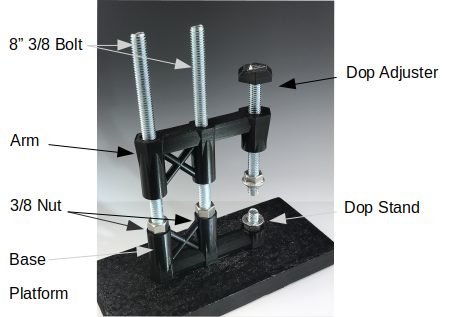
Insert the 8” 3/8 Bolts through the bottom of the Platform; embed the bolt heads in the hex holes
Slide the Base over the Bolts as shown in the image
Tighten the 3/8 Nuts onto the Bolts, firmly securing the Base to the Platform. A drop of glue or Locktite may be used to secure the nuts.
Pro tip: an AngleSelector makes a good wrench.
Slide the Arm onto the Bolts
Screw a dop onto the Dop Stand and balance the piece on the dop
Screw a dop onto the Arm Dop Adjuster
Cover the end of the dop on the Arm Dop Adjuster with epoxy
Slide the Arm onto the Bolts
Slide the Arm down so the dop on the Dop Adjuster rests securely on the piece and let the epoxy set up
Screw the dopped piece on the Dop Stand
Lower the Dop Adjuster by twisting it clockwise
Screw a dop onto the Arm Dop Adjuster
Cover the end of the dop on the Arm Dop Adjuster with epoxy
Slide the Arm onto the Bolts
Slide the Arm down so the dop on the Arm Dop Adjuster rests securely on the piece. Make sure there is enough room for the dop adjuster to unscrew the lower dop!
When the epoxy is dry, turn the Dop Adjuster counter-clockwise to remove both dops
Remove the unneeded dop