Facet Angle| The angle of a face, set by the LapDancer angle selector
| | 
|
| Click for larger image
|
Create a Plan
|
| A plan is usually required for a successful faceting of an object. It will show the face angle for each tier and facet angle for each face.
Drawing the plan not only serves as a reference while grinding, but will aid in determining which Angle Selector to use and will help identify issues before you are in
the midst of grinding.
|
| Note: The LapDancer comes with two Angle Selectors. The 30° Angle Selector has indexes for every 15°; the 45° Angle Selector has indexes for every 22.5°.
These are meant to provide a wide range of faceting options, but make sure when you are creating your plan that the angles you need are entirely on one or the other Angle Selector. Changing Angle Selectors mid-facet will very likely result in the loss of your ability to repeat angles.
|
|
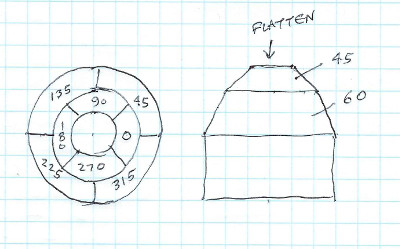
The facet plan does not have to be a complex drawing. Here is an example of a faceting plan might be drawn showing two tiers of four facets per tier with the tiers offset by 45 degrees: |
| 
|
| Facet Angles..................Face Angles (tier angles)
|
| The same plan could be written as Face Angle / 1st Facet angle, 2nd Facet angle, ..., Last Facet angle
Rewriting the example shown in the drawing above:
|
| 60 / 45, 135, 225, 315
|
| 45 / 0, 90, 180, 270
|
Setting the Face Angle
|
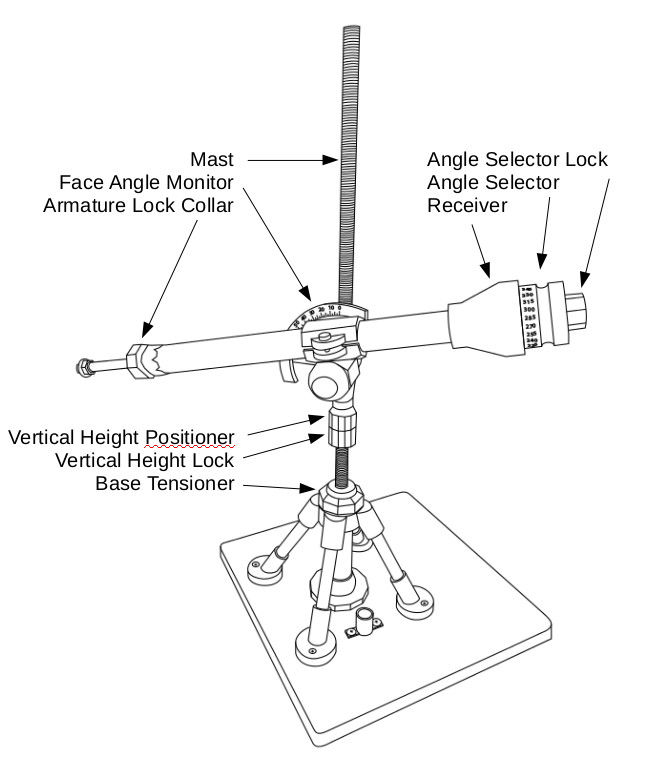
| To set the Face Angle, lay the attached piece onto the grinder. If necessary, adjust the Armature length so the piece can be moved across the grinding surface. Do this by loosening the Armature Collar screw and sliding the Armature so the piece is where you want it on the grinder.
Next, rotate the Vertical Height Positioner so the indicator on the Armature Collar points to the desired degree on the Face Angle Monitor.
Once the Face Angle is set, lock the Vertical Height Positioner in place by rotating the Vertical Height Lock snugly against the Vertical Height Positioner. Hand tightening is sufficient; no pliers or other tools are needed or should be used.
|
Setting the Facet Angle
|
| Before you begin grinding, verify you have the correct Angle Selector installed. If your design requires that you change Angle Selectors (e.g.: you have the 45° Angle Selector installed but need the 30°), unscrew the Angle Selector Lock, slide off the installed Angle Selector and slide on the new Angle Selector. Hand tighten the Angle Selector Lock snugly; no pliers or other tools should be used.
|
| To set the Facet Angle, first loosen the Armature Lock Collar about 1/2". Pull out, then rotate the Angle Selector to the desired Facet Angle. Finger tighten the Armature Lock Collar snugly, but do not use excessive force or a wrench.
NOTE: You should avoid trying to change Angle Selectors mid-piece. It is very likely that you will have a hard time relocating your existing facets.
|
Grinding
|
| Following all safety recommendations of your grinder, begin to grind. The recommended approach for grinding is to move the piece back and forth across the grinding surface. The LapDancer Armature is meant to rotate around the Mast for this purpose.
|
| The best results, especially on the initial grind is to avoid grinding adjacent faces. For example, if you are grinding four facets, grind at 0, 180, 90 and then 270 degrees.
|
| Complete all facets of a tier, from rough to polish before going to the next tier. The LapDancer does not provide a mechanism
for re-acquiring the face angle of a tier. It can be done, but requires a good eye and generally, some re-grinding.
|
| Use a bright flashlight to inspect each facet before moving to the next facet after each grind. A tiny fraction of a degree difference in the
facet can make the difference between a mirror or milky finish. Small variations are not common while using the LapDancer, but can be detected and corrected with a bit more grinding.
|
| NOTE:
The Face Angle Monitor will not change significantly for most faceting work. We have found two methods for creating consistent facet sizes.
One method is to count the number of strokes moving across the grinding surface for the first facet, then repeat that number of strokes for the remaining facets. It is best to start with a low number of strokes, then check how much material has been removed. You can always add strokes, but you can't take any back!
The second method is to use a timer of some sort and grind each facet for a consistent time. Again, start with shorter times and verify you don't remove too much material.
|